Ubuntu18.04编译android-ASOP源码-根据官方教程编写
官方参考连接:https://source.android.com/docs/setup/start?hl=zh-cn
清华参考链接:https://mirrors.tuna.tsinghua.edu.cn/help/AOSP/
步骤来源说明:
开始之前建议安装一些工具,等会要用
1 sudo apt-get install curl vim git -y
下载aosp.tar 下载地址 下载地址:https://mirrors.tuna.tsinghua.edu.cn/aosp-monthly/ ~/android/目录下tar -xvf命令解压到当前文件夹/home/app/android//home/app/android/aosp-latest.tar/home/app/android/aosp/
或不下载 后面直接使用URL同步 (会比较慢)
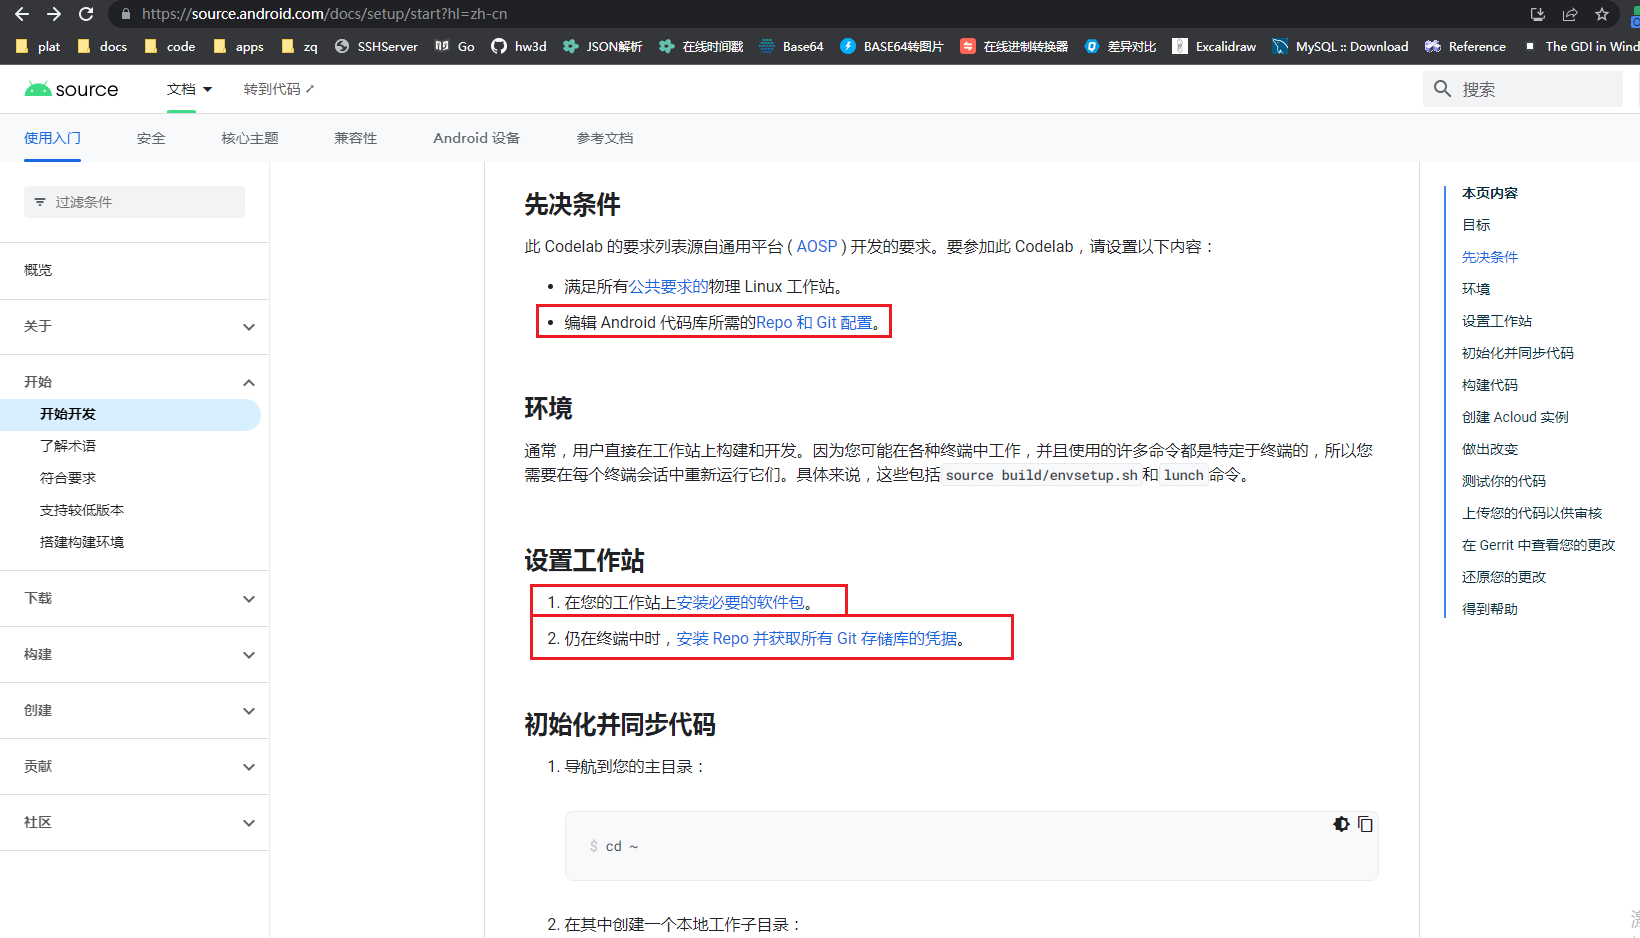
安装repo设置源 此步骤参考链接: https://source.android.com/docs/setup/download?hl=zh-cn
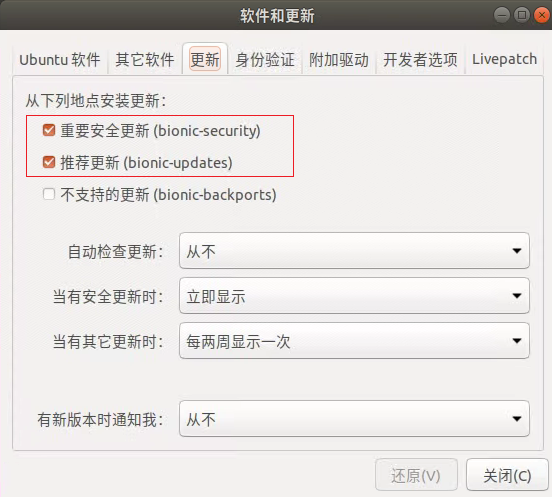
安装repo之前确保这两个是勾选状态,否则会因为依赖关系无法安装
安装repo方式1(使用apt-get) 1 2 ax@ax-virtual-machine:~$ sudo apt-get update ax@ax-virtual-machine:~$ sudo apt-get install repo -y
安装repo方式2(使用curl) 如果这些命令不适用于您的系统(例如,您发现软件包版本已过时,或者您的 Linux 发行版中没有可用的官方软件包),请使用以下命令手动安装Repo
1 mkdir -p ~/bin && curl -s https://storage.googleapis.com/git-repo-downloads/repo > ~/bin/repo && chmod a+x ~/bin/repo
为了让此命令在任何地方都可以运行,请编辑~/.bashrc文件,在最后追加以下内容,然后使用source ~/.bashrc命令使其生效
1 echo "export PATH=~/bin:\$PATH" >> ~/.bashrc && source ~/.bashrc
repo的运行过程中会尝试访问官方的git源更新自己,如果想使用tuna的镜像源进行更新,可以将如下内容复制到你的~/.bashrc,然后使用source ~/.bashrc命令使其生效
1 echo "export REPO_URL='https://mirrors.tuna.tsinghua.edu.cn/git/git-repo'" >> ~/.bashrc && source ~/.bashrc
验证是否安装完成 如果出现以下2种错误
File "/home/ax/android/aosp/.repo/repo/main.py", line 79 file=sys.stderr)"/usr/bin/env 'python' no such file or directory"
请把repo命令替换为python3 /usr/bin/repo并且以后都使用此命令
1 2 3 4 5 6 ax@ax-virtual-machine:~/android/aosp$ whereis repo repo: /usr/bin/repo /usr/share/man/man1/repo.1.gz ax@ax-virtual-machine:~/android/aosp$ python3 /usr/bin/repo version warning: Python 3 support is currently experimental. YMMV. Please use Python 2.6 - 2.7 instead. ...省略...
或者直接更改默认为python3版本(不推荐,因为编译的时候还要使用python2)
1 2 ax@ax-virtual-machine:~$ sudo mv /usr/bin/python /usr/bin/python.bak ax@ax-virtual-machine:~$ sudo ln -s /usr/bin/python3 /usr/bin/python
使用git拉取最新代码 此步骤参考链接 :https://source.android.com/docs/setup/download/downloading?hl=zh-cn
生成秘钥 1 2 ax@ax-virtual-machine:~/android/aosp$ ssh-keygen ax@ax-virtual-machine:~/android/aosp$ cat ~/.ssh/id_rsa.pub
设置基本信息 1 2 3 ax@ax-virtual-machine:~/android/aosp$ git config --global user.email "test@test.com" ax@ax-virtual-machine:~/android/aosp$ git config --global user.name "test" ax@ax-virtual-machine:~/android/aosp$ git config --global http.sslverify false
拉取最新代码 1 2 3 4 ax@ax-virtual-machine:~/android/aosp$ cd .repo/manifests ax@ax-virtual-machine:~/android/aosp/.repo/manifests$ git pull ax@ax-virtual-machine:~/android/aosp/.repo/manifests$ cd ../repo ax@ax-virtual-machine:~/android/aosp/.repo/repo$ git pull
使用repo同步源码 如果未下载aosp-latest.tar 1 2 3 ax@ax-virtual-machine:~/android/aosp/$ git branch -a ax@ax-virtual-machine:~/android/aosp/$ repo init -u https://mirrors.tuna.tsinghua.edu.cn/git/AOSP/platform/manifest -b android-9.0.0_r11 ax@ax-virtual-machine:~/android/aosp/$ repo sync -j4
如果已下载aosp-latest.tar 1 2 3 ax@ax-virtual-machine:~/android/aosp/$ git branch -a ax@ax-virtual-machine:~/android/aosp/$ repo init -b android-9.0.0_r11 ax@ax-virtual-machine:~/android/aosp/$ repo sync -j4
如果出现fatal: 不能重置索引文件至版本 'v2.32^0'。 切换目录cd .repo/repo,然后git pull更新最新数据
1 2 3 4 5 6 7 8 9 10 11 12 13 14 15 16 17 18 19 20 21 22 23 ax@ax-virtual-machine:~/android/aosp/$ repo sync -j4 warning: Python 3 support is currently experimental. YMMV. Please use Python 2.6 - 2.7 instead. ...省略... Fetching: 100% (678/678), done in 1h21m46.531s info: A new version of repo is available warning: repo is not tracking a remote branch, so it will not receive updates repo reset: error: Entry 'README.md' not uptodate. Cannot merge. fatal: 不能重置索引文件至版本 'v2.32^0' 。 ax@ax-virtual-machine:~/android/aosp/$ cd ~/android/aosp/.repo/repo/ ax@ax-virtual-machine:~/android/aosp/.repo/repo$ git pull 更新 a621254..7fa149b Fast-forward .github/workflows/flake8-postsubmit.yml | 23 ++++++++++ README.md | 4 +- command.py | 3 +- wrapper.py | 19 ++++---- 31 files changed, 591 insertions(+), 369 deletions(-) create mode 100644 tests/test_repo_trace.py delete mode 120000 tests/update_manpages.py ...省略... ax@ax-virtual-machine:~/android/aosp/.repo/repo$ cd ../../ ax@ax-virtual-machine:~/android/aosp$ repo sync -j4
安装所需的软件包(Ubuntu 18.04)准备编译工具 此步骤参考链接 :https://source.android.com/docs/setup/start/initializing?hl=zh-cn
安装openjdk-8-jdk和编译工具 1 2 ax@ax-virtual-machine:~/android/aosp$ sudo apt-get install openjdk-8-jdk -y ax@ax-virtual-machine:~/android/aosp$ sudo apt-get install git-core gnupg flex bison build-essential zip curl zlib1g-dev gcc-multilib g++-multilib libc6-dev-i386 libncurses5 lib32ncurses5-dev x11proto-core-dev libx11-dev lib32z1-dev libgl1-mesa-dev libxml2-utils xsltproc unzip fontconfig -y
选择启动目标(使用模拟器启动) 环境搭建和下载工作都已就绪,下面进入到编译环节。如果之前工作准备的充分,只需执行 1 2 3 ax@ax-virtual-machine:~/android/aosp$ source ./build/envsetup.sh ax@ax-virtual-machine:~/android/aosp$ lunch aosp_x86_64-eng ax@ax-virtual-machine:~/android/aosp$ make -j4
就可以开始编译了,编译成功后会显示绿色的#### build completed successfully (01:43:52 (hh:mm:ss)) #### 信息 。如果编译出错可以根据错误提示然后利用搜索网站排错,当然如果配置低,并发线程大的情况下经常出现莫名错误,多重新执行make,降低-j的数值就能通过。
编译通过后别急着关闭terminal窗口,在执行编译的环境下执行 1 ax@ax-virtual-machine:~/android/aosp$ emulator
如果遇到错误AOSP ERROR: x86_64 emulation currently requires hardware acceleration!
1 ax@ax-virtual-machine:~/android/aosp$ egrep -c '(vmx|svm)' /proc/cpuinfo
如果为0,则表示您的CPU不支持硬件虚拟化。如果为1或更多,你仍然需要确保在BIOS中启用了虚拟化 你需要在VMware中选择虚拟机-设置,选择处理器,在虚拟化引擎中勾选虚拟化Intel VT-x/EPT或AMD-v/RVI(I),然后重启虚拟机 然后安装KVM或VM
1 2 3 ax@ax-virtual-machine:~/android/aosp$ sudo apt-get install qemu-kvm libvirt-bin ubuntu-vm-builder bridge-utils ax@ax-virtual-machine:~/android/aosp$ sudo adduser `id -un` libvirtd ax@ax-virtual-machine:~/android/aosp$ sudo adduser `id -un` kvm
最后重启虚拟机,并检查是否安装成功
1 ax@ax-virtual-machine:~/android/aosp$ sudo kvm-ok
最后使用以下命令启动模拟器
1 2 3 4 ax@ax-virtual-machine:~/android/aosp$ source build/envsetup.sh ax@ax-virtual-machine:~/android/aosp$ lunch aosp_x86_64-eng ax@ax-virtual-machine:~/android/aosp$ make -j4 ax@ax-virtual-machine:~/android/aosp$ emulator
Ubuntu虚拟化官方文档:https://help.ubuntu.com/community/KVM/Installation
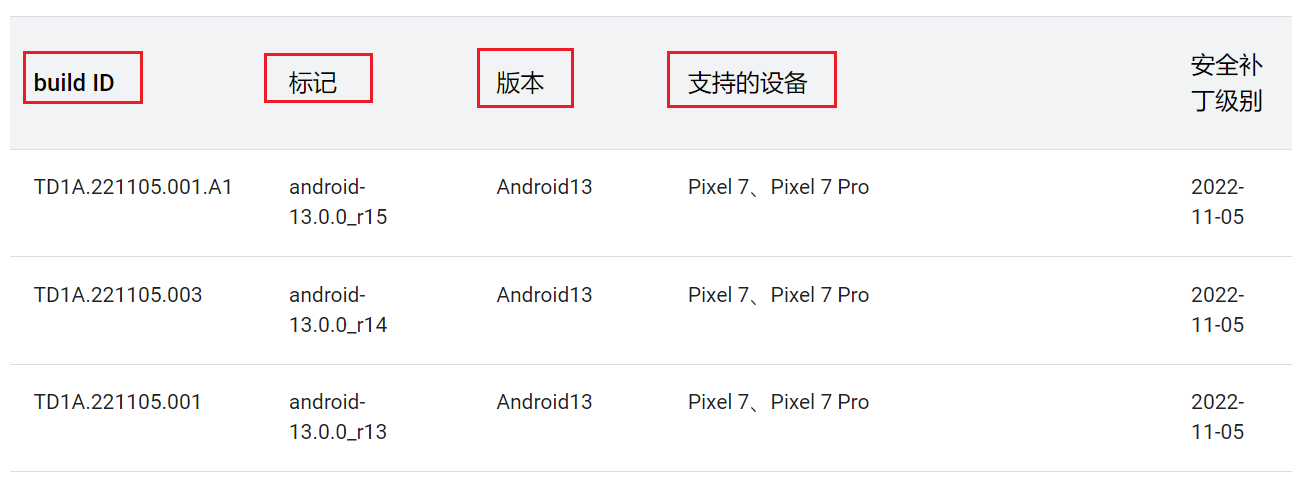
选择启动目标(使用真实手机启动) 查找手机对应的aosp分支build ID、标记 链接: https://source.android.google.cn/docs/setup/about/build-numbers?hl=zh-cn build ID:要在下面查找驱动时用到标记:是源代码的分支,编译时选择分支并 版本:android版本支持设备:要注意该分支是否支持自己的手机(本人Pixel)
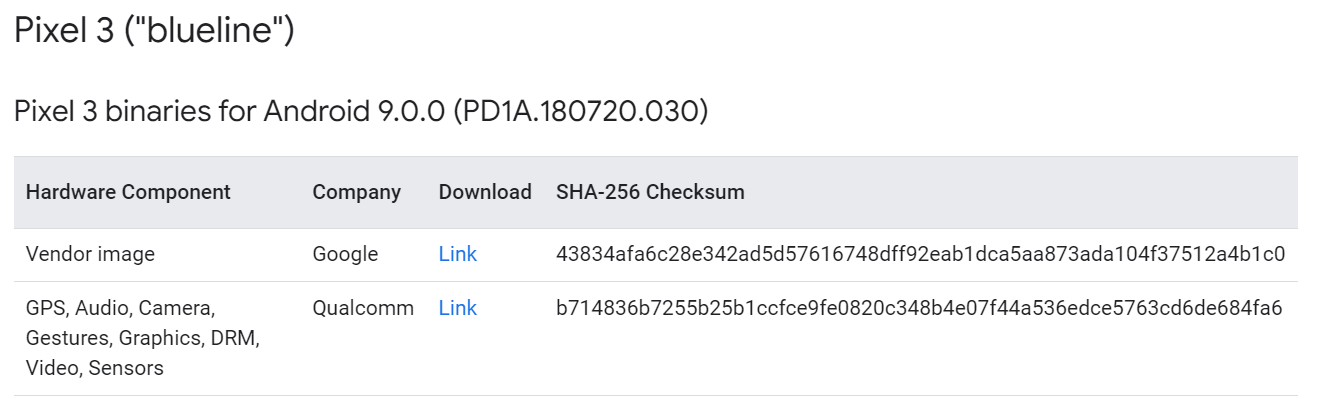
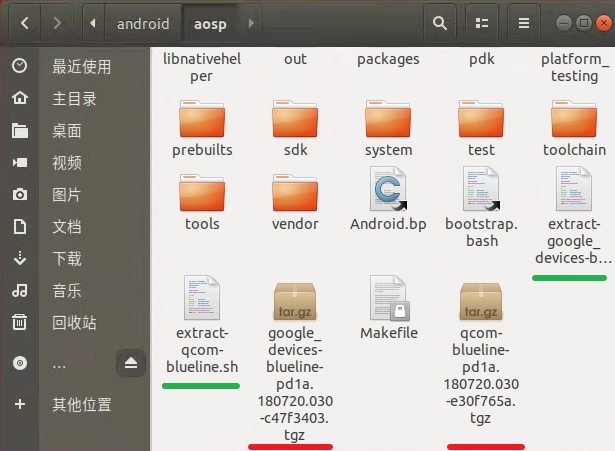
根据自己手机型号找到对应代号下载驱动 链接: https://developers.google.cn/android/drivers 本人使用的是pixel3,代号为blueline,根据上一步的build ID找到对应驱动,如本人的是PD1A.180720.030
将上面下载的两个压缩包拷贝至aosp目录,解压运行.sh文件,生成vendor驱动 注意运行.sh文件时,先读完license,后输入I ACCEPT安装完成,此时ls会看到vendor文件夹
编译aosp真机系统,这里选userdebug版本,拥有root权限 1 2 3 ax@ax-virtual-machine:~/android/aosp$ source build/envsetup.sh ax@ax-virtual-machine:~/android/aosp$ lunch aosp_blueline-userdebug ax@ax-virtual-machine:~/android/aosp$ make -j4
如果内存不足,编译时会报错,可以使用以下命令设置虚拟内存,再次编译
1 2 3 4 5 6 7 8 9 10 11 12 13 14 15 16 17 # 停用并删除现有交换文件 sudo swapoff /swapfile && sudo rm /swapfile # 创建新的交换空间(以64G为例) sudo fallocate -l 64G /swapfile && sudo chmod 600 /swapfile # 设置交换空间并激活 sudo mkswap /swapfile && sudo swapon /swapfile # 将交换空间设置为永久 echo '/swapfile swap swap defaults 0 0' | sudo tee -a /etc/fstab # 修改系统设置以启用交换空间更早启动(2GB为示例) echo 'vm.min_free_kbytes=2000000' | sudo tee -a /etc/sysctl.conf && sudo sysctl -p # 查看Swap空间 free -m
刷入镜像 如果关闭了终端再次打开之后,在执行这一步命令之前一定要执行source build/envsetup.sh命令,不然会出现Command 'fastboot' not found或<waiting for any device>
1 2 3 4 5 6 7 8 9 10 11 12 13 14 15 16 17 18 19 20 21 22 23 24 25 26 27 28 29 30 31 32 33 34 35 36 37 38 39 40 41 42 43 #检查设备是否连接(报错) ax@ax-virtual-machine:~/android/aosp$ adb devices 8AJX0TLFL no permissions (user in plugdev group; are your udev rules wrong?); see [http://developer.android.com/tools/device.html] #把使用adb的每个用户都添加于`plugdev`组中 ax@ax-virtual-machine:~/android/aosp$ sudo usermod -aG plugdev $LOGNAME #为系统添加涵盖设备的`udev`规则, `android-sdk-platform-tools-common`软件包中包含一组适用于Android设备并由社区维护的默认`udev`规则 ax@ax-virtual-machine:~/android/aosp$ sudo apt-get install android-sdk-platform-tools-common #然后重启虚拟机 #再把这两个命令执行下 ax@ax-virtual-machine:~/android/aosp$ source build/envsetup.sh ax@ax-virtual-machine:~/android/aosp$ lunch aosp_blueline-userdebug #再次检查设备是否连接 ax@ax-virtual-machine:~/android/aosp$ adb devices 8AJX0TLFL device #进入bootloader模式 ax@ax-virtual-machine:~/android/aosp$ adb reboot bootloader * daemon not running; starting now at tcp:5037 * daemon started successfully #检查设备是否连接 ax@ax-virtual-machine:~/android/aosp$ fastboot devices 8AJX0TLFL fastboot #自动刷入 -w双清(报错) ax@ax-virtual-machine:~/android/aosp$ fastboot flashall -w Ubuntu error: ANDROID_PRODUCT_OUT not set #设置环境变量 ax@ax-virtual-machine:~/android/aosp$ export ANDROID_PRODUCT_OUT=~/android/aosp/out/target/product/blueline/ #验证环境变量 ax@ax-virtual-machine:~/android/aosp$ echo $ANDROID_PRODUCT_OUT /home/ax/android/aosp/out/target/product/blueline/ #自动刷入 -w双清 ax@ax-virtual-machine:~/android/aosp$ fastboot flashall -w #重启手机 ax@ax-virtual-machine:~/android/aosp$ fastboot reboot
如果flashall方式无效,可用以下命令
1 2 3 4 5 6 7 8 9 10 11 12 13 14 15 16 17 18 19 20 21 22 #双清 fastboot erase cache fastboot erase userdata #刷入boot fastboot flash boot_a boot.img fastboot flash boot_b boot.img #刷入system.img fastboot flash system system.img fastboot flash system_b system_other.img #刷入驱动 fastboot flash vendor vendor.img #刷入其他模块(电信4G、GMS等),此步骤可省略 fastboot flash modem modem.img #重启 fastboot reboot #补充一下: 一般修改framework目录的代码, 重新编译单刷system分区即可, 但有时可能会更新到其它分区的镜像, 要以make的最终结果为准, 比如在我的日志中, vbmeta.img镜像也有更新, 则vbmeta.img也要刷入设备, 还有一种方法是到out目录下, 执行ls -tl看哪些镜像的修改时间是最新的, 就刷哪些. 如果有漏刷则可能导致无法进入Android系统.
如果刷机之后无法开机,建议检查以下情况
检查build ID和标记是否对应android-9.0.0_r11 -> PD1A.180720.030 -> Pixel 3 binaries for Android 9.0.0 (PD1A.180720.030)
检查下载的驱动build ID是否正确
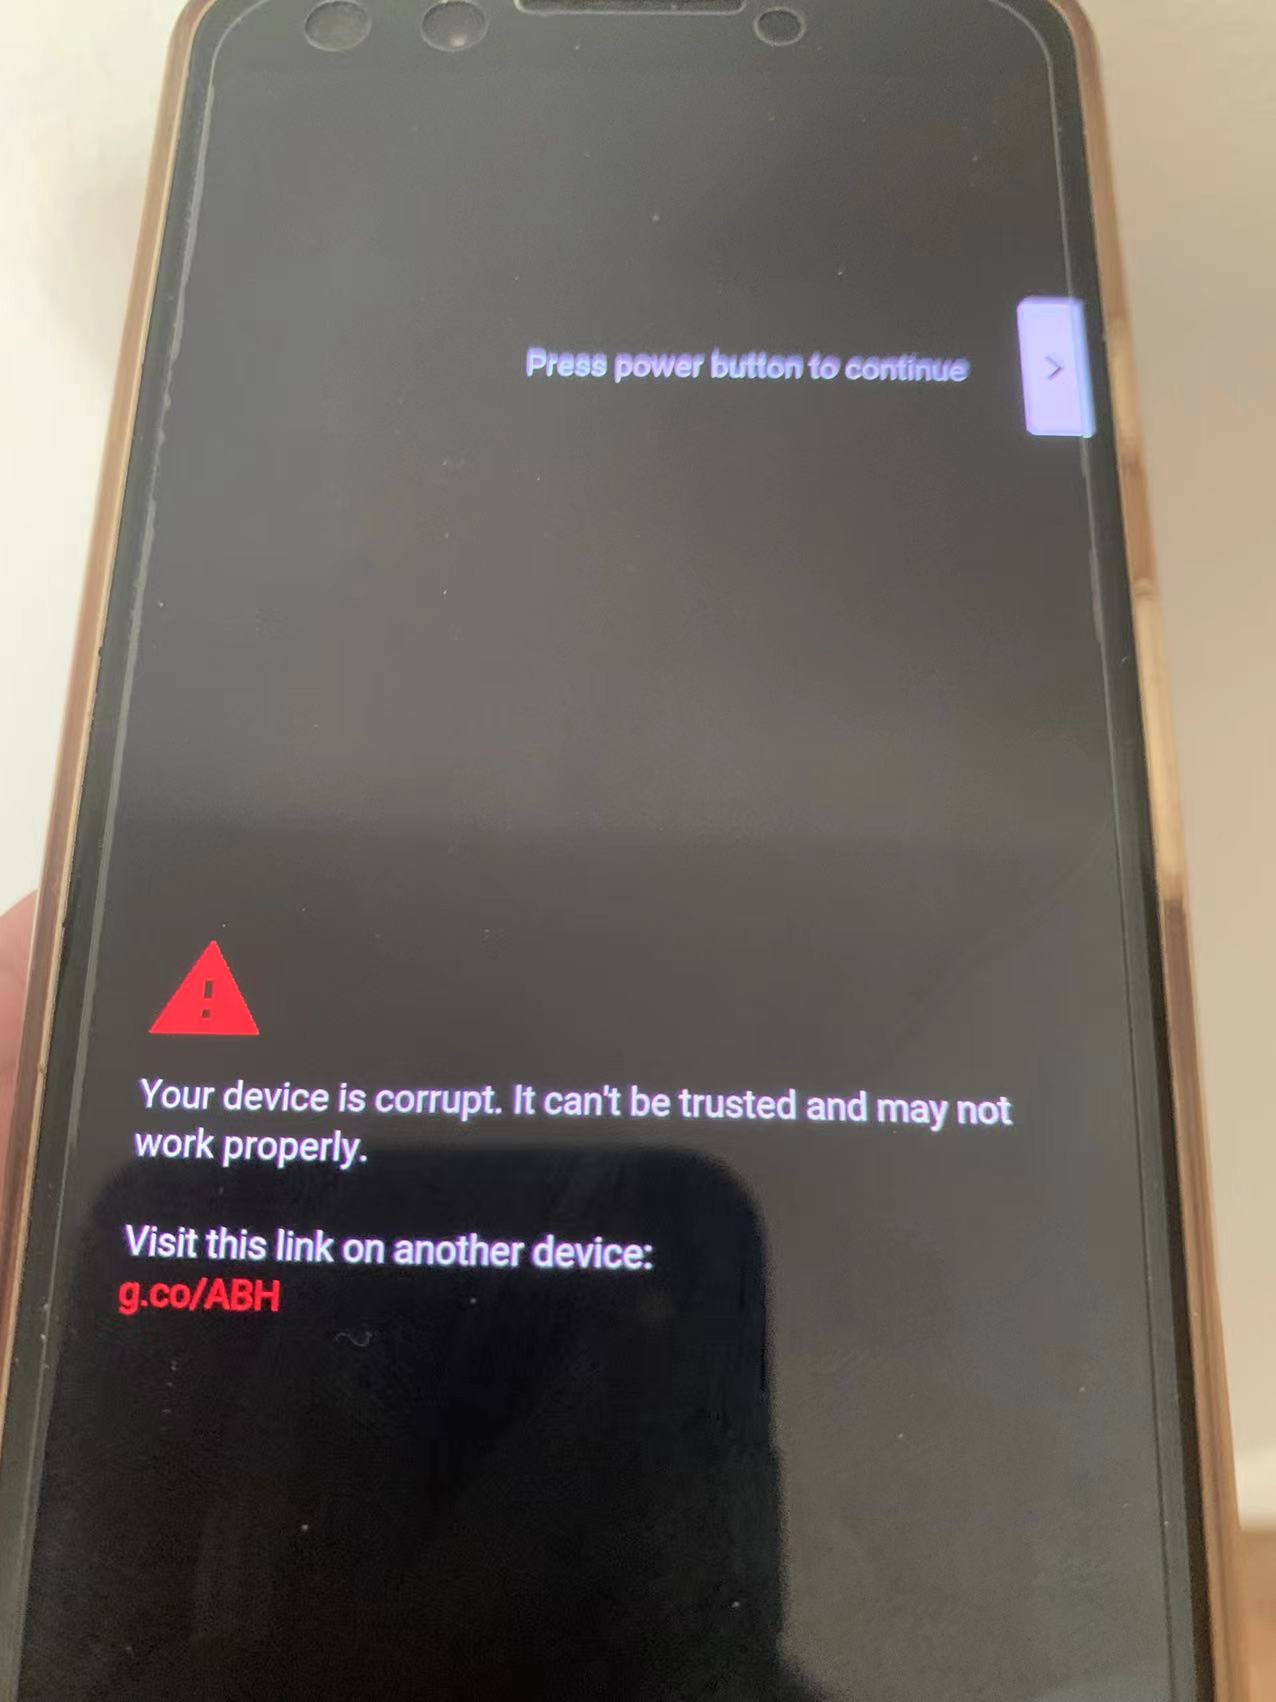
如果显示Your device is currupt. It can’t be trusted and may not work properly. 那么需要内核签名,或者检查是否有上面的情况
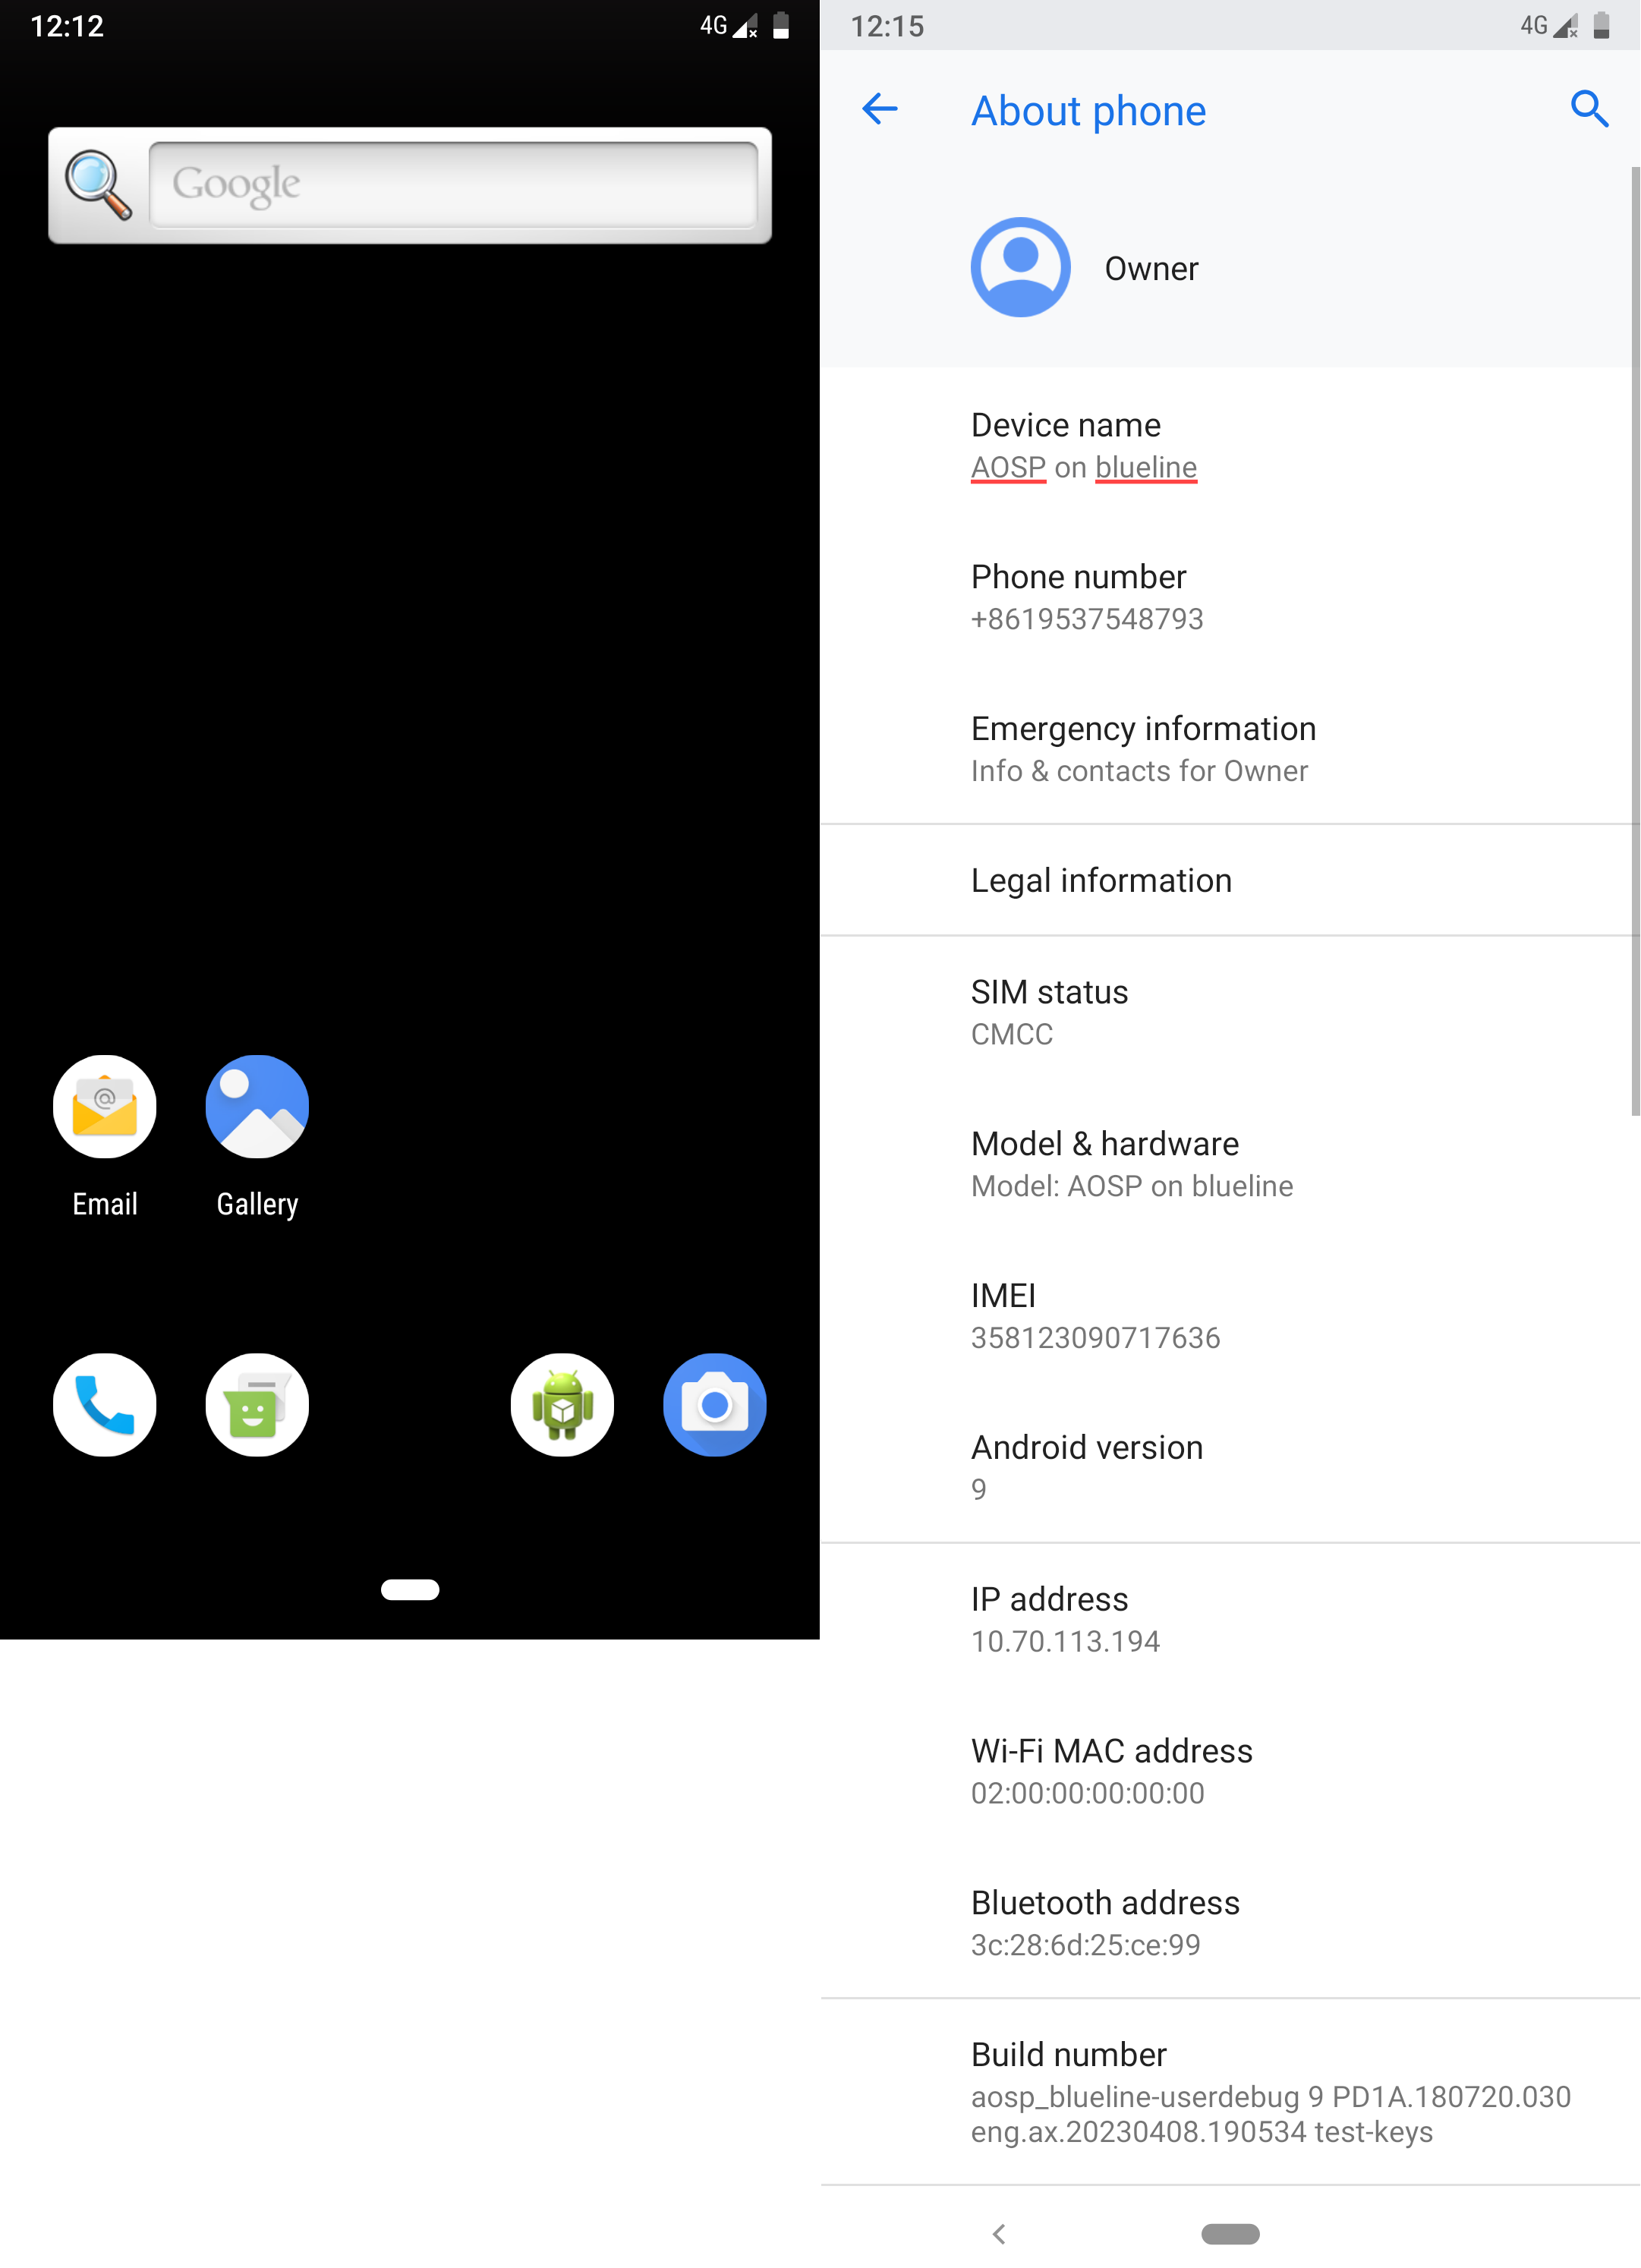
最后刷机成功截图