frp内网穿透 下载安装过于简单,不再介绍,直接进行配置 frp Centos7服务端配置
1
2
3
4
5
6
7
8
9
10
11
12
13
14
15
bindPort = 7000 # frp服务的特定端口,防火墙也需放开该端口 # 服务面板可查看frp服务状态信息 webServer.addr = "0.0.0.0" # 后台管理地址,默认是127.0.0.1,如果是公网访问则改成0.0.0.0 webServer.port = 7500 # 后台管理端口 webServer.user = "admin" # (可选)后台登录用户名 webServer.password = "admin" # (可选)后台登录密码 #transport.tls.force = true # 服务端将只接受 TLS链接 #auth.method = 'token' # 客户端访问验证方式 #auth.token = "54321" # 客户端访问验证密码,frpc要与frps一致 # 自定义的监听的端口,所有对服务器该端口访问将被转发到本地内网,做了反向代理可不处理防火墙放行 #vhostHTTPPort = 8000 #vhostHTTPSPort = 45443
frp Windows客户端A配置
1
2
3
4
5
6
7
8
9
serverAddr = "x.x.x.235" serverPort = 7000 [[proxies]] name = "upchia-rdp" type = "tcp" localIP = "127.0.0.1" localPort = 3389 remotePort = 6062
frp Windows客户端B配置
1
2
3
4
5
6
7
8
9
serverAddr = "x.x.x.235" serverPort = 7000 [[proxies]] name = "home-rdp" type = "tcp" localIP = "127.0.0.1" localPort = 3389 remotePort = 6063
启动服务 Centos7服务器启动
1 nohup ./frps -c frps.toml &
Windows客户端A执行
Windows客户端B执行
然后两个计算机就可以通过公网相互远程连接了
WireGuard异地组网 安装步骤见官网 ,本文以以下为CentOS7配置步骤 Server
1
2
3
sudo mkdir -p /etc/wireguard/ cd /etc/wireguardwg genkey | sudo tee /etc/wireguard/server_private.key | wg pubkey | sudo tee /etc/wireguard/server_public.key
Client
1
2
3
4
5
sudo mkdir -p /etc/wireguard/ cd /etc/wireguardwg genkey | sudo tee /etc/wireguard/client_private.key | wg pubkey | sudo tee /etc/wireguard/client_public.key wg genkey | sudo tee /etc/wireguard/client_private2.key | wg pubkey | sudo tee /etc/wireguard/client_public2.key wg genkey | sudo tee /etc/wireguard/client_private3.key | wg pubkey | sudo tee /etc/wireguard/client_public3.key
创建配置文件 Server
1 vim /etc/wireguard/wg0.conf
粘贴以下内容
1
2
3
4
5
6
7
8
9
10
11
12
13
14
15
16
17
18
19
20
21
22
23
24
25
26
27
[Interface] # 服务器的IP地址和子网掩码 Address = 192.168.235.1/24 # 保存当前配置,当wg-quick down命令被调用时,会将当前配置写入文件 SaveConfig = true # 服务器监听的端口 ListenPort = 51820 # 服务器的私钥 PrivateKey = uCS8bLlbBlVHYSUKbP2sNkXk+FNWB/HNwGcV/I1R+Hg= [Peer] # 客户端A的公钥 PublicKey = VUPkl2T+0+E1408K5hCzsQMfDy3xVXuStE80phc7GDw= # 客户端A允许访问的IP地址范围 确保 AllowedIPs 配置为 /32,表示单个IP地址。 AllowedIPs = 192.168.235.11/32 [Peer] # 客户端B的公钥 PublicKey = z47um997I9lIxwUIAikDYhVK9GYn6Q/OZfVMFjAzzWs= # 客户端B允许访问的IP地址范围 确保 AllowedIPs 配置为 /32,表示单个IP地址。 AllowedIPs = 192.168.235.12/32 [Peer] # 客户端C的公钥(如果有) PublicKey = WvZxvKycso++a9Hm0OHM/zvjH+zYDwvUKW67O94aqnE= # 客户端C允许访问的IP地址范围 确保 AllowedIPs 配置为 /32,表示单个IP地址。 AllowedIPs = 192.168.235.13/32
修改权限
1 sudo chmod 600 /etc/wireguard/ -R
开启服务器转发
1
2
echo "net.ipv4.ip_forward = 1" >> /etc/sysctl.confsysctl -p
ClientA
1
2
3
4
5
6
7
8
9
10
11
12
13
14
15
16
17
[Interface] PrivateKey = CGuMjID0d5g5jFiTrjseArg/zg0KAPYZhXI1sqP8Imw= Address = 192.168.235.11/24 DNS = 8.8.8.8 [Peer] PublicKey = u3Lw6khu3feJ7A4e8YaxYL3LXtPKxTC4RhtJsv/cqw8= AllowedIPs = 192.168.235.0/24 Endpoint = x.x.x.235:51820 PersistentKeepalive = 25
ClientB
1
2
3
4
5
6
7
8
9
10
11
12
13
14
15
16
17
[Interface] PrivateKey = CEuKSQ5RzuM4wcZEkk5uo671cghR27mVDWtrZ4xzN2c= Address = 192.168.235.12/24 DNS = 8.8.8.8 [Peer] PublicKey = u3Lw6khu3feJ7A4e8YaxYL3LXtPKxTC4RhtJsv/cqw8= AllowedIPs = 192.168.235.0/24 Endpoint = x.x.x.235:51820 PersistentKeepalive = 25
ClientC
1
2
3
4
5
6
7
8
9
10
11
12
13
14
15
16
17
[Interface] PrivateKey = QHLRQOpTHKegJNpVgyHLABiZag64M454v9wj3DzrAWw= Address = 192.168.235.13/24 DNS = 8.8.8.8 [Peer] PublicKey = u3Lw6khu3feJ7A4e8YaxYL3LXtPKxTC4RhtJsv/cqw8= AllowedIPs = 192.168.235.0/24 Endpoint = x.x.x.235:51820 PersistentKeepalive = 25
在服务端需要生成一些文件,第一为服务器密钥文件,其他为每个客户端密钥文件 1 2 3 4 5 6 7 8 9 10 11 12 13 [root@iZ2ze52byy60pi256dt6lsZ wireguard] total 44K 4.0K drw------- 2 root root 4.0K May 27 17:57 . 4.0K drwxr-xr-x. 82 root root 4.0K May 27 17:01 .. 4.0K -rw------- 1 root root 45 May 27 17:05 client_private.key 4.0K -rw-r--r-- 1 root root 45 May 27 17:36 client_private2.key 4.0K -rw-r--r-- 1 root root 45 May 27 17:36 client_private3.key 4.0K -rw------- 1 root root 45 May 27 17:05 client_public.key 4.0K -rw-r--r-- 1 root root 45 May 27 17:36 client_public2.key 4.0K -rw-r--r-- 1 root root 45 May 27 17:36 client_public3.key 4.0K -rw------- 1 root root 45 May 27 17:05 server_private.key 4.0K -rw------- 1 root root 45 May 27 17:05 server_public.key 4.0K -rw------- 1 root root 466 May 27 17:57 wg0.conf
密钥文件内容如下,
1 2 3 4 5 6 7 8 9 10 11 12 13 14 15 16 17 18 19 20 21 22 23 24 [root@iZ2ze52byy60pi256dt6lsZ wireguard] ==> client_private.key <== CGuMjID0d5g5jFiTrjseArg/zg0KAPYZhXI1sqP8Imw= ==> client_private2.key <== CEuKSQ5RzuM4wcZEkk5uo671cghR27mVDWtrZ4xzN2c= ==> client_private3.key <== QHLRQOpTHKegJNpVgyHLABiZag64M454v9wj3DzrAWw= ==> client_public.key <== VUPkl2T+0+E1408K5hCzsQMfDy3xVXuStE80phc7GDw= ==> client_public2.key <== z47um997I9lIxwUIAikDYhVK9GYn6Q/OZfVMFjAzzWs= ==> client_public3.key <== WvZxvKycso++a9Hm0OHM/zvjH+zYDwvUKW67O94aqnE= ==> server_private.key <== uCS8bLlbBlVHYSUKbP2sNkXk+FNWB/HNwGcV/I1R+Hg= ==> server_public.key <== u3Lw6khu3feJ7A4e8YaxYL3LXtPKxTC4RhtJsv/cqw8=
启动服务 设置开机自动启动
1 systemctl enable wg-quick@wg0
启动
1 sudo wg-quick up /etc/wireguard/wg0.conf
停止
1 sudo wg-quick down /etc/wireguard/wg0.conf
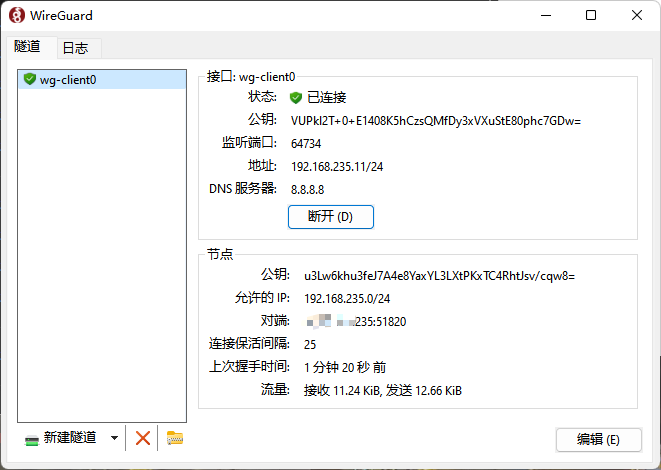
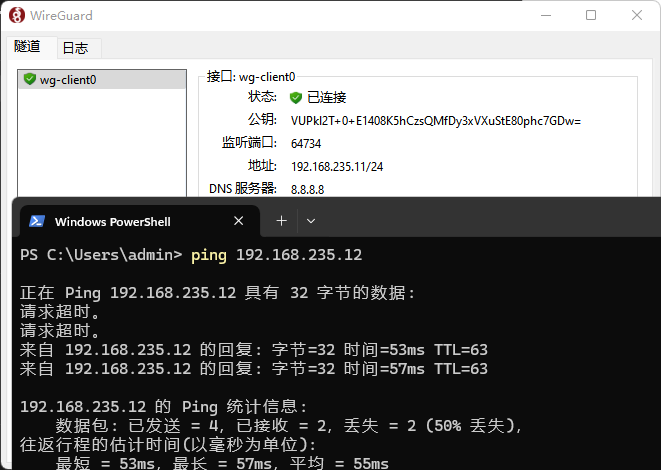
Widnows客户端直接安装,把配置文件导入然后连接即可